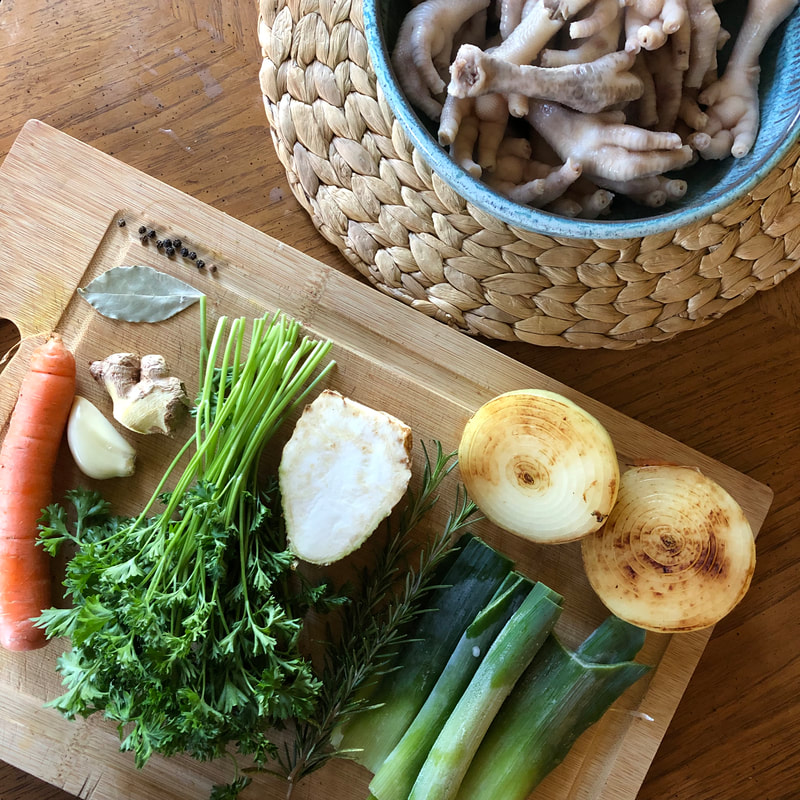
Although most Americans may be weirded out by chicken feet, many cultures use chicken feet as part of their home cooking. Since feet are really high in connective tissue, they make a very gelatinous broth, more so than beef bones. If you want that jelly...then make chicken feet broth! If you are feeling a cold or flu coming on, needing extra collagen for healing after surgery or birth, or are wanting to boost your skin health, then drinking homemade bone broth can help.
Makes 8-10 servings Time: 6-8 hours or more INGREDIENTS 2lbs chicken feet (I buy mine from Osprey Hill Farms) 1 whole onion, cut in half (keep peel on) 1 leek 1/2 small celeriac root 2 carrots (cut in half) 1/2 bunch parsley 2 cloves garlic 1 thumb length ginger root 1 sprig rosemary (or 2-3 sprigs thyme) 1 bay leaf 10-15 peppercorns Splash apple cider vinegar DIRECTIONS Bring a large pot of water to a boil. Add the chicken feet to the pot and boil for 5 minutes. Strain the chicken feet and briefly rinse under cold water. Using scissors, cut the nails off at the first joint. This is done very easily, you don't need special kitchen shears for this. Meanwhile, sear the onion face side down in a skillet until browned. Place the feet, seared onion and all the rest of the ingredients into a pot (or slow cooker) and cover with filtered water. Bring to a simmer, and reduce heat to low. Allow to very gently simmer for at least 4 hours, preferably 6-10. If using a slow cooker, put heat on low for 10 hours. Use only what is needed from the base pot of bone broth for soups or simply for drinking. Season that separately with salt, bouillon and/or dulse flakes. Pour more fresh filtered water into the bone broth pot to replace what has been taken out. Continue to simmer. Repeat this until the broth lacks flavor. Alternatively, you can transfer all of the bone broth into glass mason jars and freeze what is not needed for immediate use. For individuals with IBS & SIBO: If you want to make a Low FODMAP alternative simply omit the garlic and onion, and use only the green parts of the leek. Keep in mind some individuals with SIBO do not tolerate collagen rich broth. Use small amounts as tolerated.
1 Comment
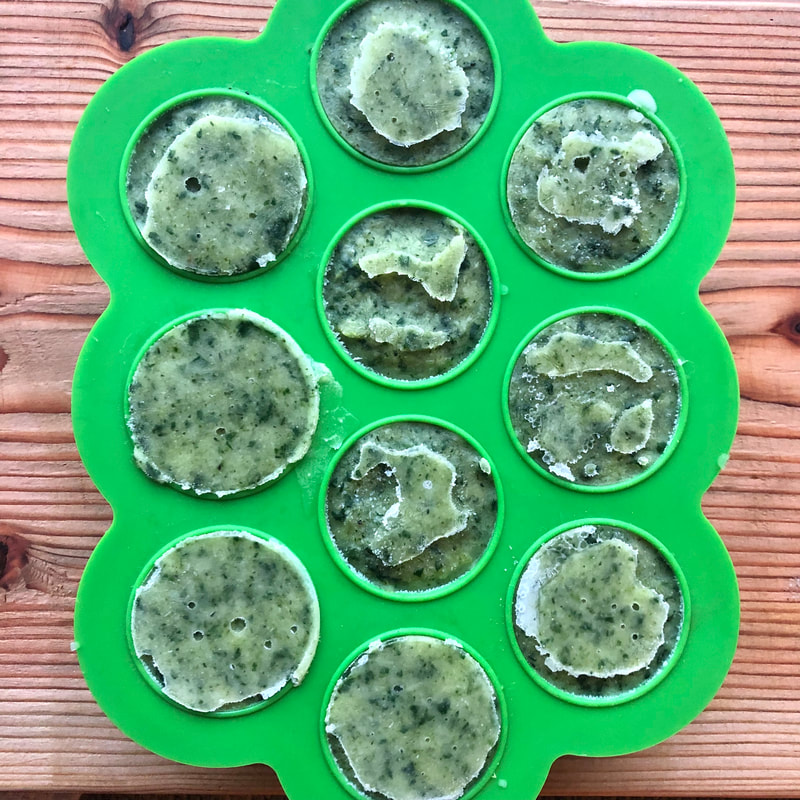
Getting your little to eat greens can sometimes be difficult, especially early on when they do not have the pincer grasp down yet. This recipe combines two superstars broccoli and spinach carefully blended with naturally sweet onion and sweet potato to round out the slight bitterness of the greens. I love to make baby egg pancakes with this mixture. Toren absolutely loves them and is able to use his pincer grasp to eat them on his own. This way not only is he getting his veggies, but also his choline and active vitamin A from the egg yolk! Plus, for some reason Toren isn't a big fan of scrambled eggs lately, but total digs the egg pancakes (see below for instructions on making an egg pancake). Usually, Toren eats one egg pancake throughout the day. Makes 10 Servings Time: ~ 20 minutes INGREDIENTS 1/2 sweet potato (tan/white) 1 medium onion, peeled, and cut in halves 2 cloves garlic 10 florets broccoli 1 cup packed baby spinach 2 tablespoons salted grass-fed butter 2 tablespoons Great Lakes Hydrolyzed Collagen Ground pepper DIRECTIONS Peel the sweet potato and coarsely chop. Add to steamer basket along with onion, garlic. Steam for 5 minutes and add the broccoli florets. Steam for another 10 minutes or until all the veggies are fork tender. Meanwhile steam/cook the spinach in the microwave for 1 minute or until bright green and tender. Place the potato, onion, garlic, butter and collagen into food processor and blend until smooth and creamy. Then add the broccoli and spinach and process until smooth. Add a little freshly ground pepper. Pulse to combine. Transfer to a baby food freezer tray, cover, and freeze. Once frozen transfer to a silicone ziplock bag or glass mason jar and keep frozen. To thaw simply remove one serving and leave in a bowl in the fridge overnight or quickly microwave for 15-30 seconds. Prior to serving make sure to test the temperature to make sure it is not too hot for baby. Nutrition (per serving): 45kcal, 2.4g fat, 4.3g carbs, 1.2g fiber, 2.3g protein.
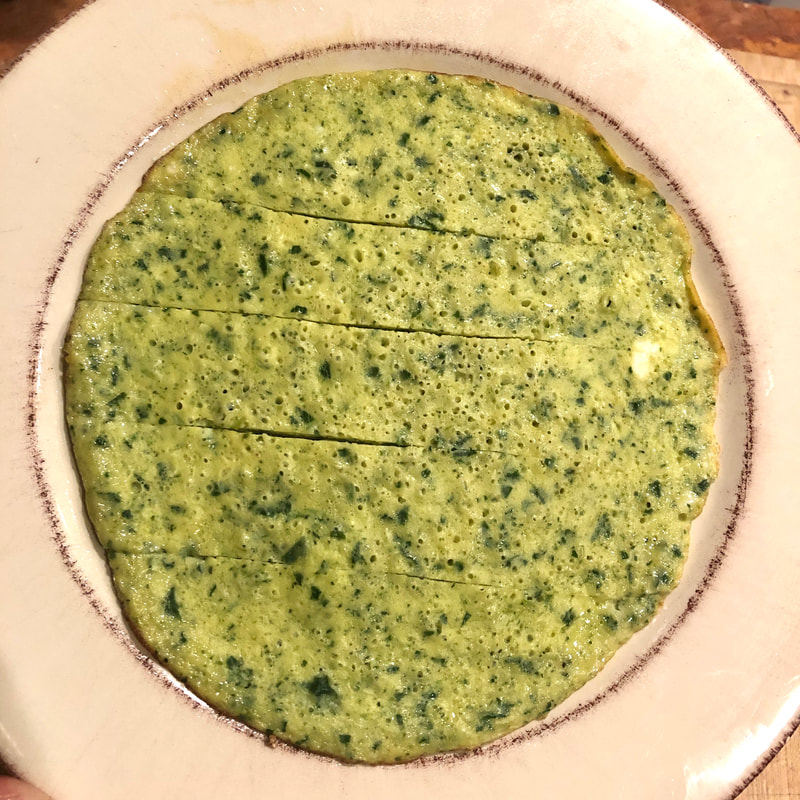
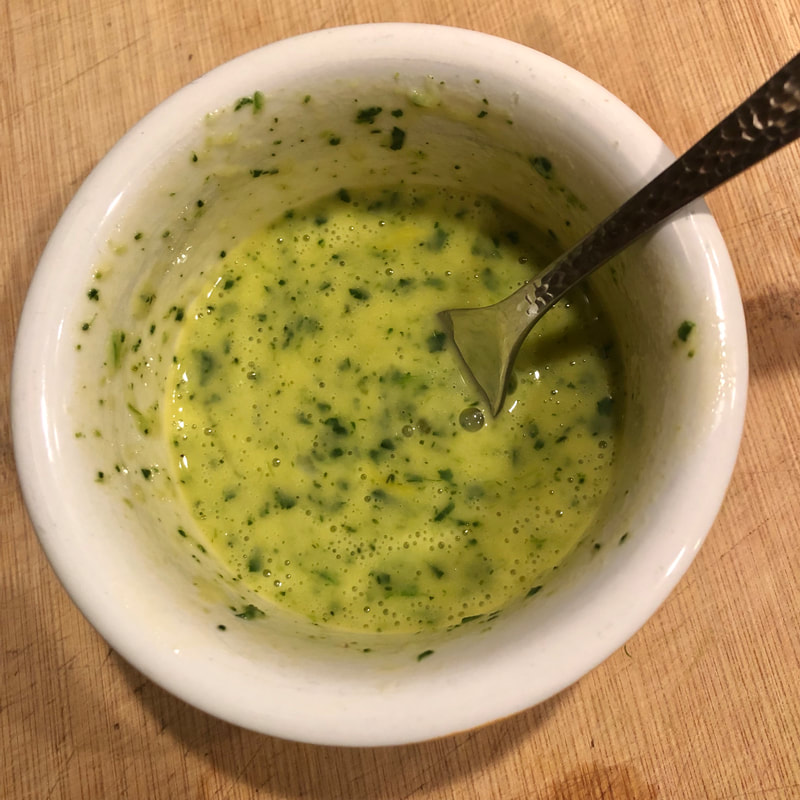
Baby Veggie Egg Pancake
This is a breakfast staple around our house and is great for older babies and toddlers. However, not all purees work because they have too much water. Avoid using the pre-made baby purees because the pancake will just stick and burn. Use the Broccoli Spinach Baby VEGGIE BLEND or the Apple Butternut VEGGIE BLEND for good results. Toren usually eats a couple slices of his egg pancake with a side of fruit like kiwi or berries. We refrigerate the leftovers for an easy protein throughout the day. Makes 1 serving Time: <5 minutes INGREDIENTS 1 cube of a VEGGIE BLEND, thawed (the Broccoli Spinach and Apple Butternut work well) 1 pasture-raised egg, beaten with a fork butter/ghee DIRECITONS Mix together the egg and the thawed single serving of a veggie blend of your choice. Meanwhile preheat a small cast iron pan over medium heat. Add a teaspoon of butter or ghee, and once hot add the egg mixture. Reduce heat to medium low, cover with a lid, and set timer for 3 minutes. Remove lid, turn off heat, and let egg pancake sit another minute or two. Transfer to a plate, cut into slices, and serve once cooled. Nutrition (per 1 egg pancake): 155kcal, 5g carbs, 1.2g fiber, 11.5g fat, 8.5g protein
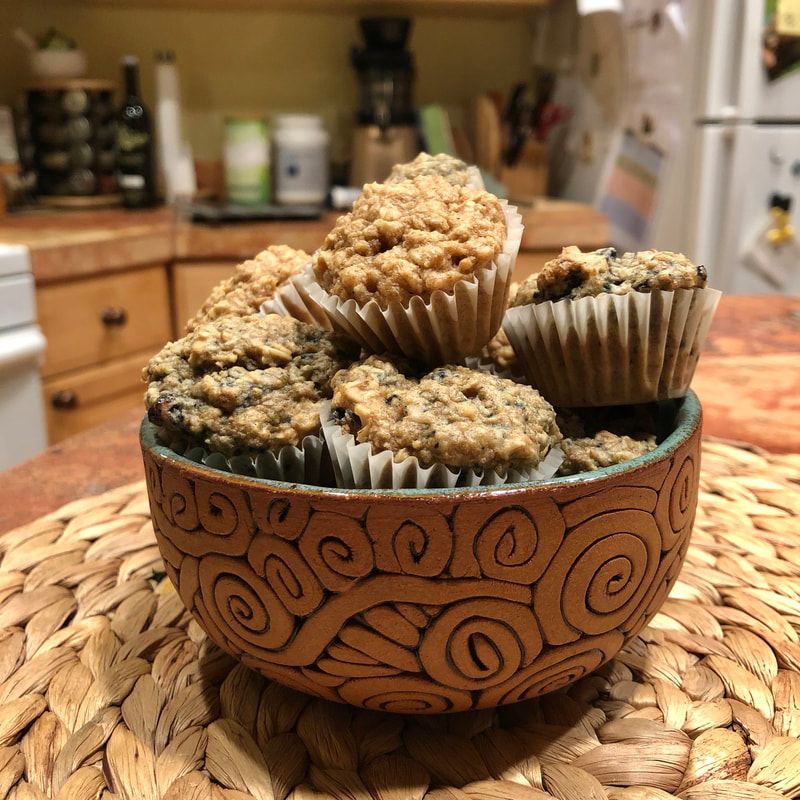
Unfortunately many kiddos struggle with food allergies. This recipe is dedicated to a sweet patient of mine who has multiple food allergies (nuts, soy, egg, wheat, strawberries, and fish) and seems to also have a latex food syndrome. A latex allergy can cause cross reactivity to certain plant proteins, most commonly banana, avocado, and kiwi. However, there are many more plant foods that can trigger a reaction. In my patient’s case it also includes common fruits and vegetables often used in muffin recipes. Typical symptoms include swelling of the lips/face, itchy throat, rashes and hives. So in order to create a little muffin that this kiddo can enjoy on the road or at home, I decided to get busy in the kitchen. I wanted it to keep it as simple as possible with minimal kitchen tools required. I used Neat Egg for this recipe, which I found at my local Fred Meyers for $5, but you can also use a pasture-raised egg if egg allergies are not an issue. I like the Neat Egg because it contains only two ingredients; chia seeds and chickpeas. Other egg replacers often use refined starches and gums. The optional add in’s allow you to modify the recipe to accommodate your child’s preference and/or tolerance. If you add more dried/freeze dried fruit, it adds a little bit more sweetness. If you add chopped nuts, it makes it more nutrient dense and filling. You can also sneak in some greens using a greens powder. It’s up to you and your little one! I often make multiple variations in a single batch by splitting the mixture into two or three and adding the extra fixin's to each separate bowl. Sometimes I just keep it simple and leave the batch plain. Whatever makes your little kiddo happy :)
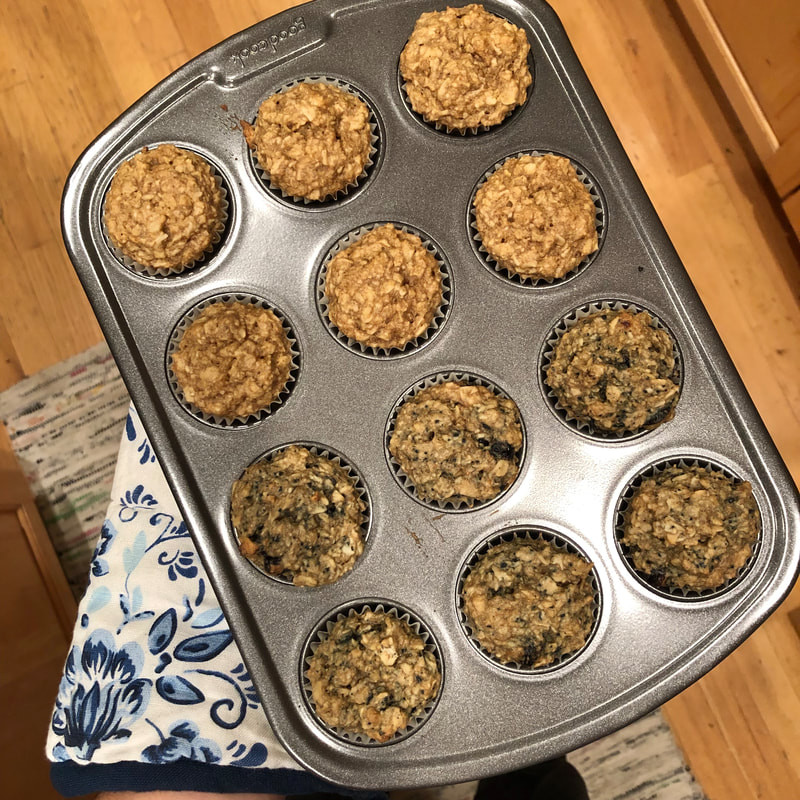
Servings: about 14 little muffins (or 12 little muffins and 1 regular muffin for mama) OR about 6 regular muffins Time: 30-45 minutes (depending on the total baking time) INGREDIENTS 1 ¼ cup gluten free rolled oats ¼ cup non-dairy milk 1 tablespoon apple cider vinegar/lemon juice 1/3 cup maple syrup (see note) 1 Neat Egg (1 tablespoon Neat Egg mixed with 2 tablespoons water) 2 tablespoons olive oil (or any oil/melted butter) 1 tablespoon ground flaxseed 1 teaspoon vanilla extract 1/8th teaspoon salt 1 teaspoon baking powder ¼ teaspoon baking soda Optional Add Ins: Crushed freeze dried fruit (Trader Joes carries blueberries, strawberries, and raspberries) Dried fruit (craisins, raisins, dried currants, dried blueberries, dried cherries, etc) Grated carrots Chopped nuts/seeds Cinnamon, cocoa powder, etc Dried coconut flakes Supergreens powder (no more than 1 tsp) DIRECTIONS Preheat oven to 350 degrees. In a medium bowl mix together the oats, non-dairy milk, and 1 tablespoon vinegar or lemon juice. Stir well and let sit 5 minutes, and then stir vigorously until oats break up and soften. Add the maple syrup, olive oil, ground flaxseed, vanilla extract, and sea salt. Stir vigorously until well combined and resembles more of a "batter". The oats shouldn't resemble whole oats that much anymore. You may need to add 1 tablespoon extra non-dairy milk to make sure the batter is “wet” enough if you are using the Neat Egg or using less maple syrup (see note below). Mix together the baking powder and baking soda in a small bowl and sprinkle small amounts into the batter, while stirring. Continue to gradually incorporate the leaveners evenly. DO NOT ADD THEM IN ALL AT ONCE. Make sure your baking soda is fresh, because old baking soda will not give the rise you are looking for. Finally, stir in any optional add ins. Place muffin liners into your muffin tin and transfer your mixture. I like to keep half the batch plain. So I transfer half of the mixture into the lined muffin tins. Then I add a handful of crushed freeze dried blueberries from TJ's or whatever else I think would be good and transfer the remaining mixture into the the leftover muffin tins. I only have a 12 muffin tin for small muffins, so I always have enough leftover to fill 1 regular muffin (mom's treat). Bake the small muffins for about 18-20 minutes. For regular muffins bake for 25-30 minutes, or when an inserted toothpick comes out clean. Remove the muffin from the oven, and allow them to cool in muffin tin for at least 15 minutes if not an hour. Patience is a virtue :) Toren likes the muffin broken up into small bite sized pieces. For older toddlers, you can give it to them whole. Also, you can easily freeze the muffins, and thaw in the microwave when needed. They taste great on their own, or warmed up and topped with butter, nut/seed butter, cream cheese, or for a fancy birthday, top with a dollop of homemade whipped cream. Note: I like to use less maple syrup (1/4 cup) when I want to add extra dried/freeze dried fruit because they will add extra sweetness. I use more maple syrup (1/3 cup) when I am not adding in more fruit and instead adding in extra nuts/veggies or when I am keeping it plain. When you are using less maple syrup, then you may need an extra tablespoon of the non-dairy milk to make up the liquid factor. Nutrition (small muffin): 70kcal, 2.7g fat, 10.5g carbs, 1g fiber, 1.2g protein Nutrition (regular muffin): 160kcal, 6.4g fat, 24g carbs, 2.4g fiber 2.7g protein Substitutions: 1) You may replace the Neat Egg with 1 regular pasture-raised egg. 2) You can replace the olive oil with any kind of oil, melted butter, etc 3) You can replace the maple syrup with honey, but I suggest using only 1/4 cup as honey is much sweeter than maple syrup. |
RecipesI hope you enjoy my creative, flavorful, and nutrient dense approach to whole foods cooking. All recipes are gluten free. Archives
December 2022
Categories
All
|


 RSS Feed

|

|
Providing custom functional nutrition therapy since 2015.
Follow HBN on Social Media!
©Happy Belly Nutrition, LLC 2015-2023