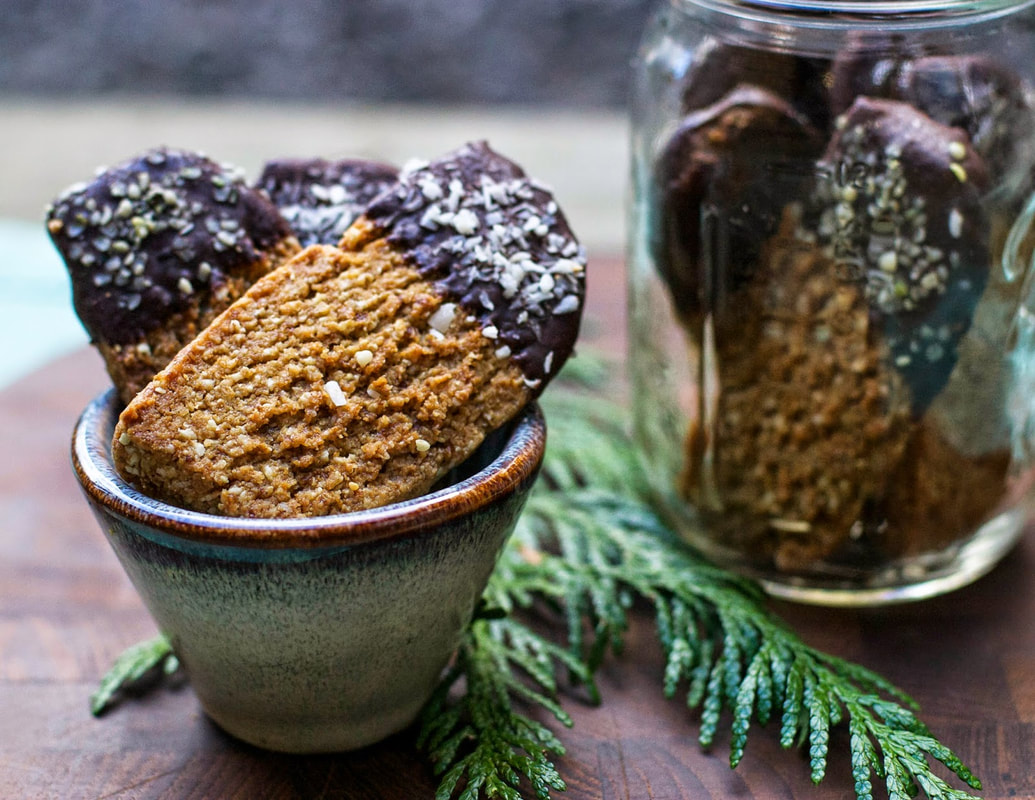
 This post is adapted from the original on my old food blog Poppies & Papayas published in 2014. Tis the season to bake cookies! Truth be told, I am not much of a cookie person. I do, however, have a soft spot for cookies that I can dip into a cup of afternoon tea or coffee. A sweet little pick me up to carry me through to dinner on a crisp and sunny winter day. A day just like today, where the sun warms my cheeks and the cool air energizes me with every deep breath. The kind of day where a long brisk walk should end with a cozy cup of tea and a homemade cookie. And since my son insists that Santa needs his cookie and glass of milk, it was time to bake these wholesome delights again. 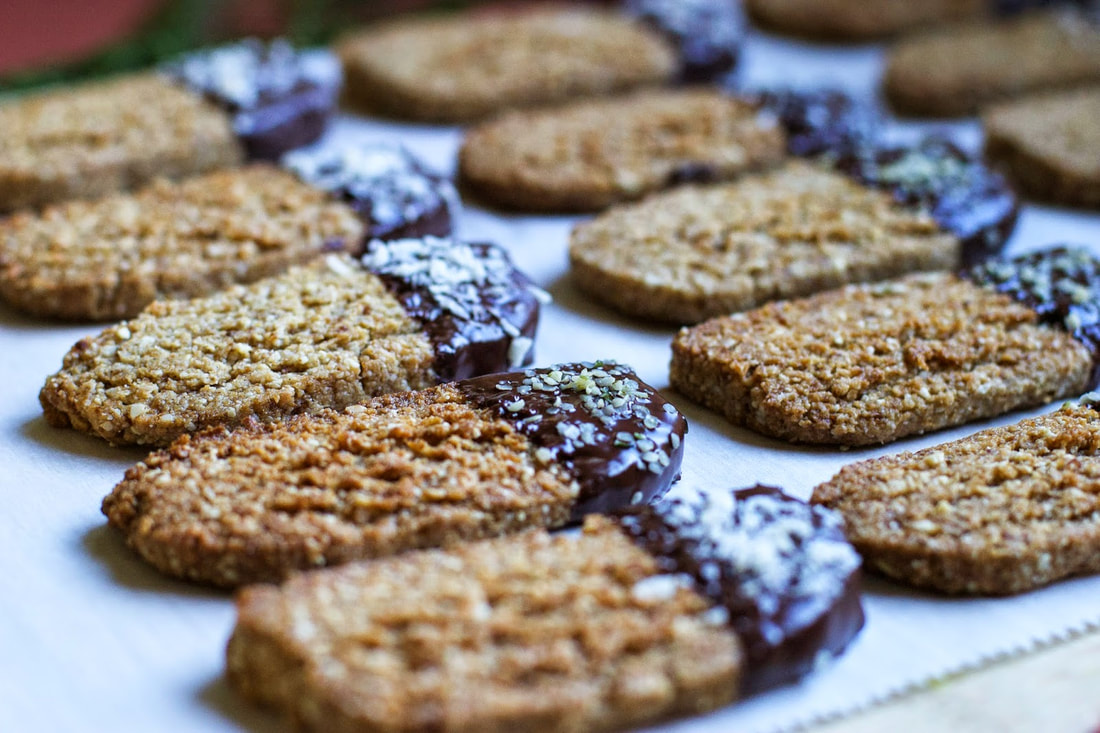 Since 2014, when I first developed this cookie recipe, I have been making them every year. They have become my holiday cookie tradition. These cashew coconut cookies are my wholesome take on a crunchy shortbread cookie, lightly sweet, and super satisfying. They can shine just like any ol' traditional holiday treat, trust me. And now that I have a super cute, almost four-year-old kitchen helper, it's even more fun to share the cookie making experience. So what sorts of goodness will you find in these cookies? A good amount of cashews, shredded unsweetened coconut, coconut sugar and coconut oil, a wee bit of sweet sorghum flour, a splash of vanilla, and a sprinkle of cardamom…all roasted and toasted and dipped into delicious semi-sweet dark chocolate! Of course you can choose whatever chocolate you want, milk chocolate, flavored chocolate, or even go with no chocolate. It's up to you! May this be my holiday gift to you, my dear friends! A gift that keeps on giving throughout the holiday season. Surprise your co-workers, your family members, or even your dearest friends with totally delicious sweet treats. With that I wish you a beautiful, sunny and crisp winter day, a long brisk walk, and a hot tea and cookie to come home to. 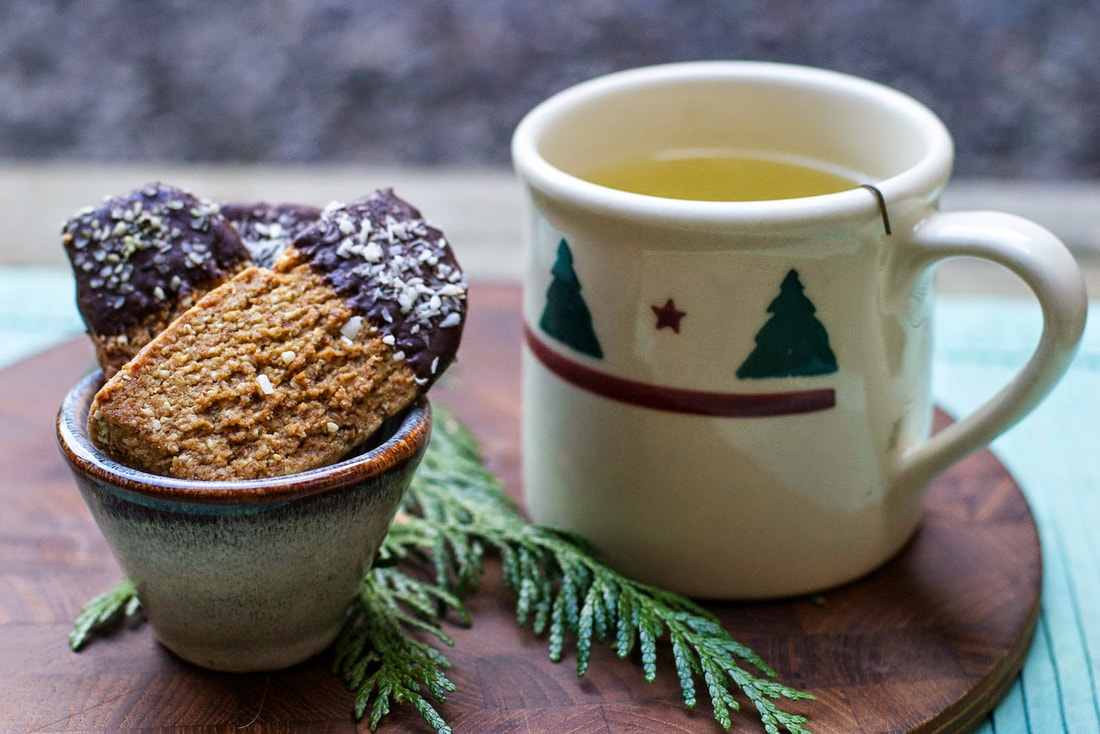 Cashew Coconut Dippers
In this recipe I used sweet sorghum flour. It's a nice alternative to rice based GF flours. Usually, I can find this in the BULK section of my natural foods store. However, if you can't find it, you can also use Bob's GF 1:1 baking mix flour blend, or even use just plain rice flour. The fine psyllium husk powder I usually purchase in the BULK section as well. However, you can also buy it in large quantities here. Makes about 2 dozen INGREDIENTS 1 ½ cups whole raw cashews 1 cup shredded coconut, unsweetened ½ cup coconut sugar ¼ teaspoon sea salt ¾ teaspoon ground cardamom 2 tablespoons fine psyllium husk powder ½ teaspoon baking soda ½ cup sweet sorghum flour (or any other kind of GF flour) 2-3 tablespoons coconut milk (or any other kind of milk) 1 ½ teaspoons vanilla extract ¼ cup coconut oil, packed 1 - 3oz chocolate bar, chopped (or use chocolate chips) Optional: extra shredded coconut for garnish DIRECTIONS Place the cashews and shredded coconut into a food processor and process until they resemble a mealy texture. Add the coconut sugar, sea salt, cardamom, psyllium husk, baking soda, and sorghum flour. Pulse to combine. Add the coconut milk, the vanilla extract, and coconut oil. Process until the mixture begins to clump together and form a type of “dough”. Scrape the mixture down the side of the processor to help blend the ingredients enough. Don't worry, you can't really over process the "dough" because at this point the food processor doesn't even process the mixture anymore because it clumps up so much. The mixture should easily stick together when pressed together with your fingers. Gather up the cookie "dough" and place onto a parchment sheet. Press the dough into the shape of a long rectangle to create dipper-like cookies. Take your time here. This may take a little bit of effort as the "dough" tends to be a bit more crumbly than traditional cookie dough. The heat of your hands will help release more of the oils and make it easier to shape the log. In the end you want a cohesive, smooth looking log. Depending on the size and shape of your log, it can impact how many individual cookies you can make. Wrap up the rectangle with the remaining parchment paper and refrigerate for at least an hour.This step is crucial as it allows the psyllium husk and oils to bind the dough making it easier to cut later on. Preheat the oven to 350 degrees Fahrenheit, and remove the cookie dough from the refrigerator. With a sharp knife cut slices off of the rectangle that are about a ¼ of an inch thick. Place each slice onto a parchment lined baking sheet. You will need two baking sheets, one per dozen. Bake the cookies for about 12 minutes or until golden brown and fragrant. They will still be soft to touch when removed from the oven. Therefore, allow the cookies to cool completely on the baking sheet before moving them. I usually place the whole sheet outside to cool quickly. Meanwhile, create a double boiler by heating a little bit of water over medium heat in small saucepan. Place the chopped chocolate or chocolate chips in a small bowl or glass, and place the dish in the heated water. Stir until the chocolate is completely melted. Remove the saucepan from the heat, leaving the bowl inside to keep the chocolate warm. Dunk the end of each cookie into the melted chocolate and place back onto a parchment lined sheet. Alternatively, you can brush the tops of the cookies with chocolate using a pastry brush. Decorate each cookie with a sprinkle of shredded coconut, and allow to cool. Store in an airtight container. Serve with a cup of hot tea or decaf coffee as an afternoon delight.
0 Comments
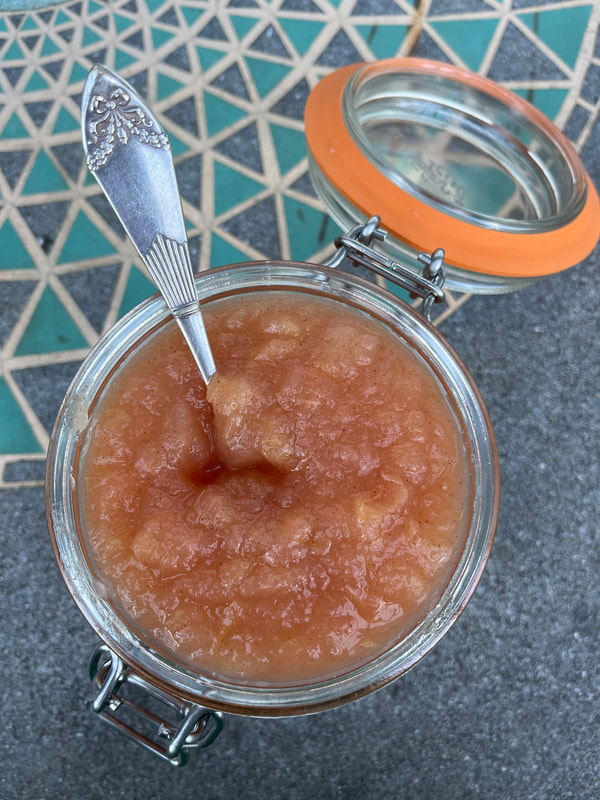
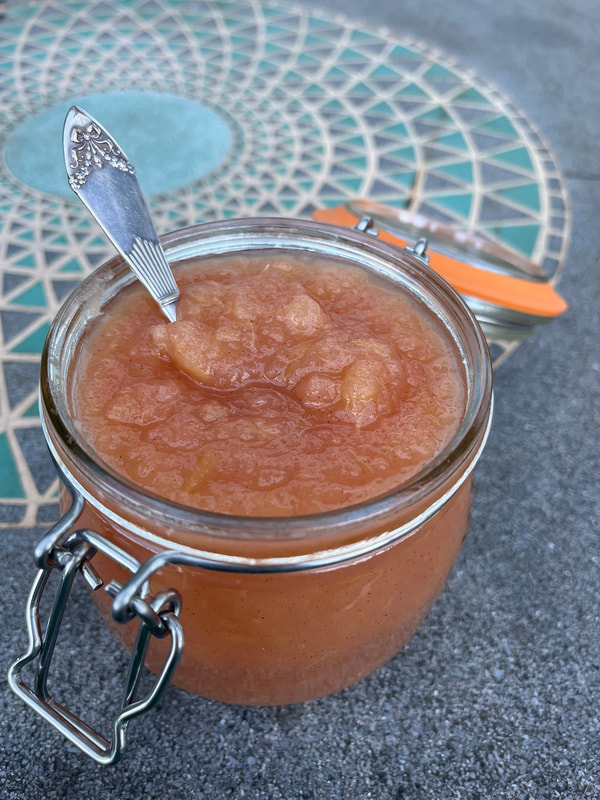
Homemade Applesauce with a Special Twist
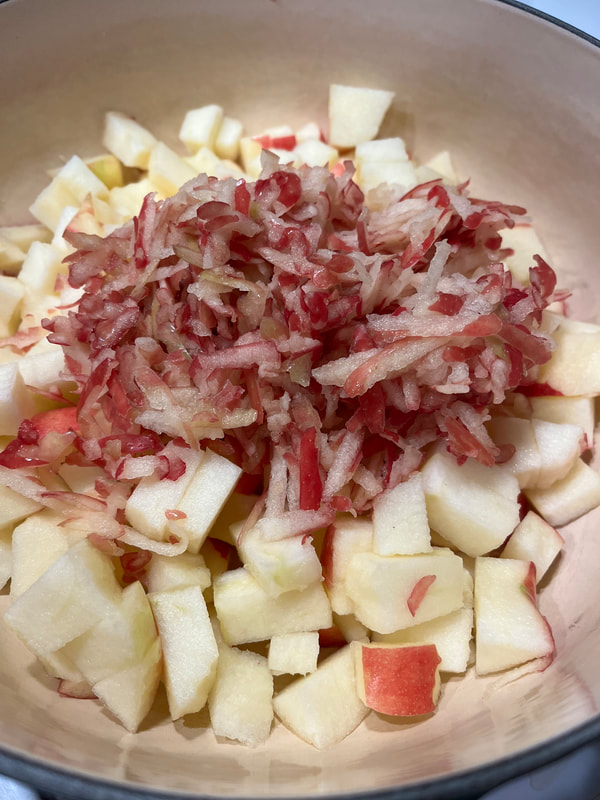
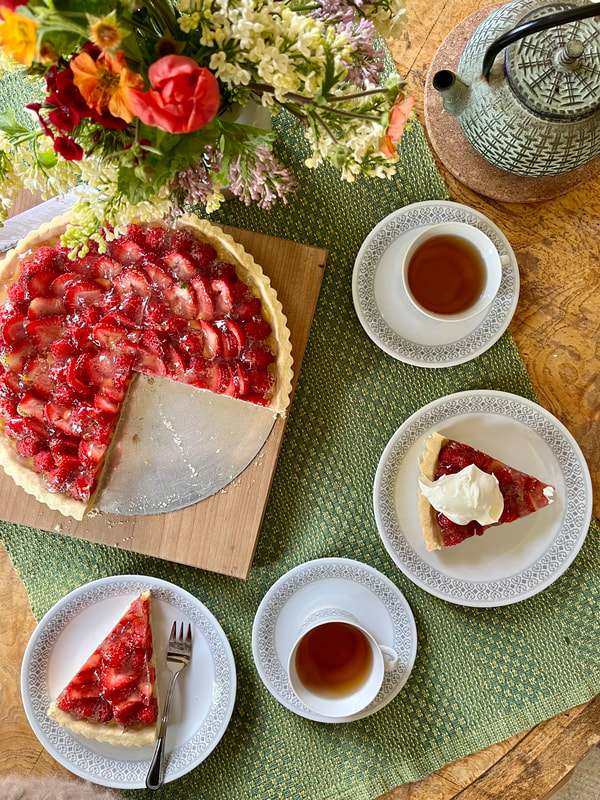
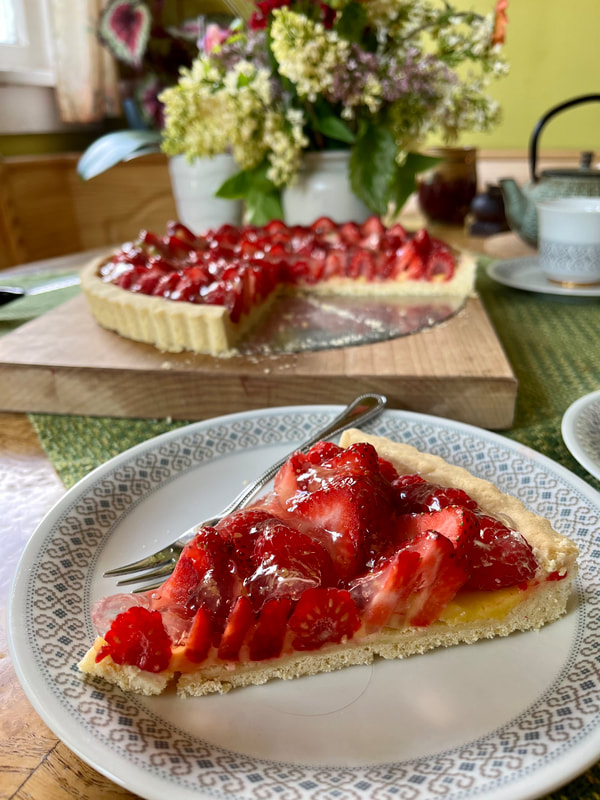
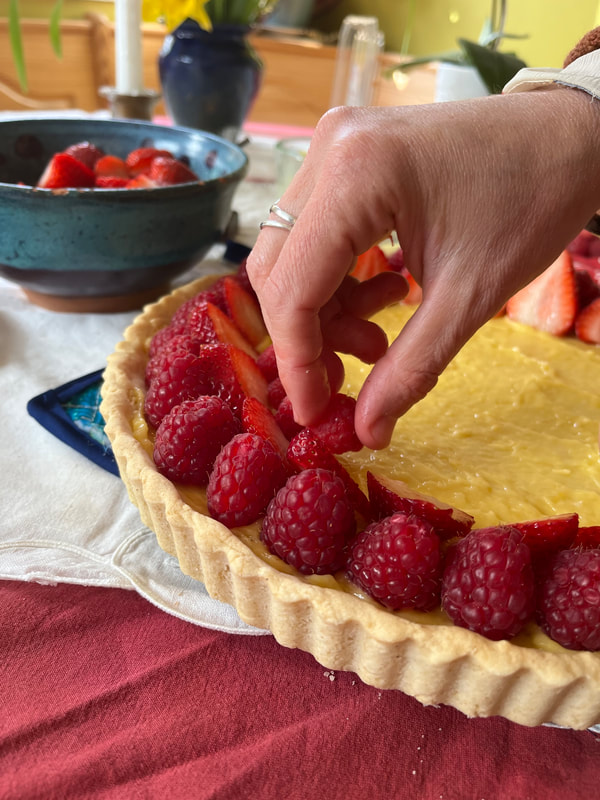
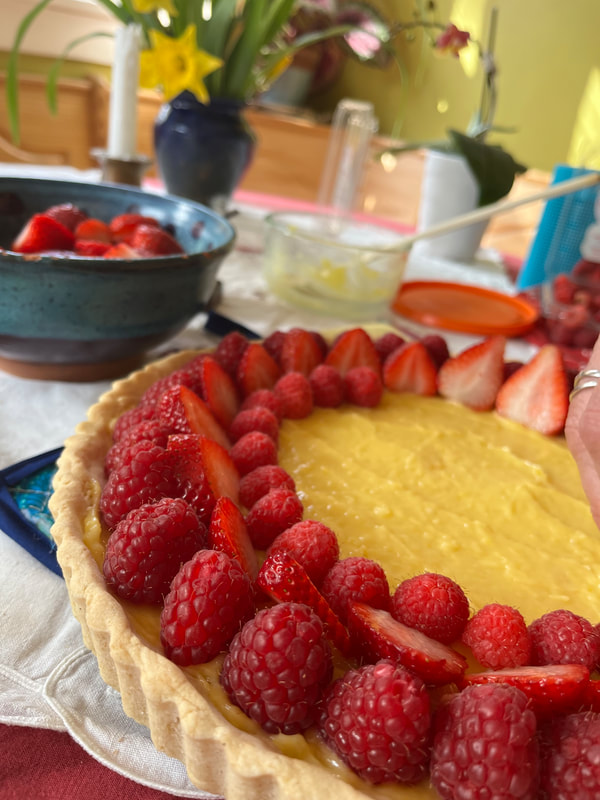
Most people peel their apples when making applesauce to keep the texture nice and smooth. But in the process they are discarding the most nutritious part! The apple peel is rich in gut loving and anti-inflammatory polyphenols including well known quercetin. Quercetin is most well known for inhibiting the production and release of histamine, thereby reducing the severity of seasonal allergies and other histamine related symptoms. The peel is also an excellent source of pectin a soluble fiber which can soothe the GI tract and can be especially helpful when struggling with diarrhea. Pectin is also fermented by good gut microbes and therefore helps support a healthy and diverse gut microbiome. Since we are keeping the peel on for this applesauce, it becomes increasingly important to choose ORGANIC apples, as conventional apples are highly sprayed with pesticides. And to help improve texture of applesauce, I recommend grating the apple peels instead of just coarsely chopping the apples. Although this is an extra step, it allows the apple peel to easily dissolve during the cooking process, leaving the texture more smooth. With the addition of the skin, and the increase in polyphenols and pectin, the applesauce is pinker in color and is thicker in texture. However, apples are rich in fructose and sorbitol, two kinds of sugars that are considered FODMAPs. If you don't tolerate either of these well, then applesauce (and apples) may trigger uncomfortable digestive symptoms until the underlying cause is addressed, such as SIBO (small intestinal bacterial overgrowth), which can lead to fructose malabsorption. Some people unfortunately, struggle with hereditary fructose intolerance, and will have to limit fructose entirely to avoid uncomfortable symptoms. Applesauce INGREDIENTS Organic apples Filtered water Lemon juice Spices (fresh ginger root, cinnamon, vanilla, etc) Sea salt Sweetener of choice (optional) - depending on the type of apple you may need more of less DIRECTIONS Wash your apples and grate the peels. Cut out the core and dice up the remaining apple flesh. Add the grated peels, apple bits, water, lemon juice, and your choice of spices to a large pot, cover, and bring to a simmer. Simmer until tender, about 15-20 minutes depending on the size of the chunks. Remove lid, and mash with a potato masher or whisk, stir in salt, and optional sweetener to taste. You may continue to simmer uncovered for a couple of minutes to evaporate excess water if needed until desired texture is achieved. Transfer to a sealable glass jar and enjoy. I love it with Nancy’s whole milk yogurt or cottage cheese. Show me your applesauce making skills!! 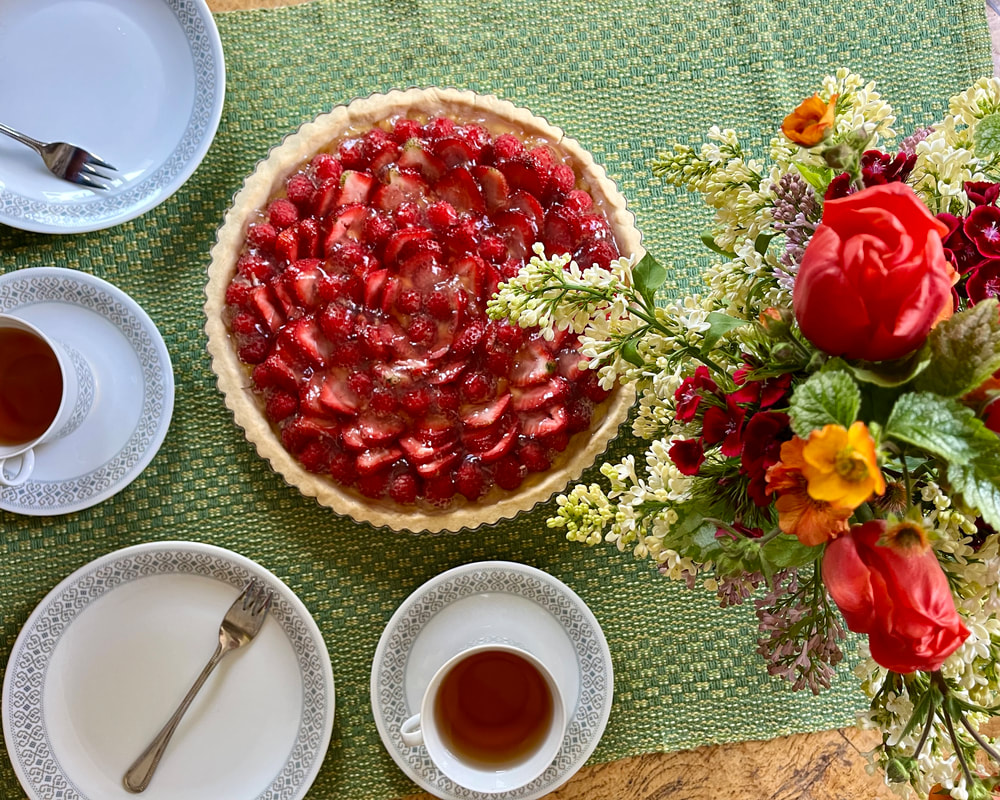 To celebrate Mother's day I would like to share my favorite spring tart. It is very refreshing, light, and symbolic of Spring and Summer. If you like lemony desserts then this is for you! Plus, it looks beautiful and is a wonderful dessert for any special occasion. Although each step is very simple and very easy, some steps do take some time. In order to make this tart with ease, I recommend making the cookie crust and lemon curd the night before so that you can sleep away the cooling time and quickly make the rest of the tart the following day. Fortunately, for those who may be on a restricted diet, this tart is gluten free and naturally low FODMAP if you stick with strawberries and raspberries. Also, it only contains butter, so those who are dairy sensitive may still be able to tolerate it. Serves 8. Sweet Cookie Crust: ½ cup softened salted butter (I use Kerrygold) ¼ cup sugar 1 egg 1 ¼ cup Bob’s 1:1 flour, plus more as needed ½ tsp baking powder Lemon Curd ½ cup lemon juice (~3 lemons) 1 whole egg 1 yolk 3 tablespoons natural cane sugar Zest of 1 lemon 2 T salted butter, flaked Berry Topping 1lb of organic strawberries, washed 12oz of raspberries (or another pound of strawberries) Optional: Any other berries of choosing Lemon Zest Gelee 1 cup (250ml) water, divided 2 ½ teaspoons gelatin or 1 packet Knox Gelatin Zest of ½ lemon 2 tablespoons sugar
With a wooden spoon stir together the softened butter, sugar, and egg. Mix together the flour with the baking powder and gradually mix into the creamed butter mixture. Using the spoon and your hands mix dough until smooth, adding more flour as needed until the dough is no longer super sticky and easily handled. Gluten free flour will always be a bit more sticky than regular flour. Flatten into a disc and cover with plastic wrap or parchment paper. Refrigerate 1 hour or best overnight. When ready to bake the tart, remove the dough from the refrigerator and allow to warm up a bit until pliable and knead a bit. Preheat the oven to 350 degrees. Lightly oil the pan. Then roll out the dough (or see tip) to fit a 10” tart pan. Poke holes into the crust with a fork and bake for 20 minutes or until lightly golden. Allow to cool completely. Tip: Since gluten free dough tends to tear easily, and to avoid discarding bits of the dough, I prefer to break the dough into 4 or 5 equal chunks and divide it out directly onto the tart pan. Then using a baby bottle (without the top) I like to roll out the dough directly into the pan. Then using my fingers I spread the dough evenly into the sides. This way there is no transfer and all dough is used up. Meanwhile, while the dough is chilling, make the lemon curd. In a small saucepan simmer the fresh lemon juice over medium heat until reduced down by half. Pour into a small bowl and set aside to cool. Create a double boiler by filling a saucepan with about 2 inches of water. Bring to a boil and reduce to a simmer. In a ceramic bowl that is large enough to sit in the saucepan without the water overflowing, mix together the whole egg, the egg yolk, sugar, and lemon zest. Add the cooled lemon juice, and whisk together. Place the bowl into the medium saucepan, and whisk continuously until the mixture thickens. Using heat proof gloves remove from the heat and immediately add the salted butter flakes to the curd and whisk for about a minute to create a shiny smooth lemon curd. Transfer into a small glass jar and refrigerate.
While curd and cookie crust are cooling, prep the berries of your choice. If using strawberries, rinse well and cut off the green tops. Depending on the size of the strawberry slice into half, thirds, or quarters to have even slices. If using raspberries, leave them as is because water tends to soften them too much. Rinse and dry blackberries or blueberries if using.
Once the cookie crust is cooled and the curd is cold, use a spatula to evenly spread the curd over the bottom of the crust. Then arrange the berries on top in any way that suits your fancy and refrigerate. Finally, pour ~1/4 of the cold water into a jar and sprinkle the gelatin on top. Pour the remaining water into a saucepan. Add the lemon zest and sugar and bring to a boil. Once boiling allow to simmer for a minute and then remove from heat. Add ~2 tablespoon of the hot liquid to the cold liquid and stir to combine. Then pour the cold liquid mixture back into the hot liquid mixture. Stir to combine. Transfer the gelee mixture into a glass or metal bowl and refrigerate until it is just starting to gel. You want it to be spoonable and thick like kefir, but not thin like water. Check after 30 minutes, then again every 5 minutes so that you don't miss the perfect texture. If it does gel too much, just sit the bowl into a warm water bath to gently warm up the gelee and thin up a little. Gently spoon the mixture evenly over the entire tart to cover the berries as best as possible. Then refrigerate the entire tart until the gelee has fully set and ready to serve. Best enjoyed within 3-4 days after making, if it lasts that long. For extra decadence serve with homemade whipped cream, but it’s not required because it tastes super yummy on its own. |
RecipesI hope you enjoy my creative, flavorful, and nutrient dense approach to whole foods cooking. All recipes are gluten free. Archives
December 2022
Categories
All
|
 RSS Feed

|

|
Providing custom functional nutrition therapy since 2015.
Follow HBN on Social Media!
©Happy Belly Nutrition, LLC 2015-2023